anatomy of a photo // dream state

Apr 27, 2012

I used to think that I needed to have a clear, concise concept before making an image; that I had to know what my intent was before pressing the shutter. And if I didn't, I felt like a failure and not much of an artist. But now I realize that's kind of backwards for me. This image is an example of how I decided, weeks after taking the original photos, to experiment with two of them in post-processing just to see where it would take me.


So I'm gonna break down how this image came about. I'm not going to explain all the nitty-gritty step-by-step details, because this isn't a tutorial. Just a glimpse at my process, if you will.

I used two photos to make this, and here's the first I used. I shot this at a friend's studio where she works (actually, this was an empty room right next to the studio), and we were both just messing around with our cameras, doing whatever came to mind with whatever props were available. At the time, I was thinking, "hey I'll try a levitation-type photo." So my friend Kristina pressed the shutter for me, while I gave my core a serious workout with all the balancing and faux-levitating. We had a strobe setup camera left, and I took like 30 shots of me in various positions.


And here's another photo I took in that room about half an hour later, completely unrelated to that other photo. Kristina was using this fishbowl as a prop for her own photo, and while she was at her camera checking the images, I shot this super fast and without any thought. Natural light. I really just wanted to document what was going on.

So fast-forward a couple weeks. I had given up on my initial levitation-over-a-pillow idea, because it just wasn't coming together in Photoshop like I wanted. Something was off. I was looking over the entire batch of photos from that day, and when I noticed my lone fishbowl photo, I decided to paste one of my levitation shots onto it to see what happened.


Here's what it looked like after selecting, copying, pasting, resizing, rotating, and some layer masking of my "self" onto the fishbowl image. This was the most tedious part. I thought about placing myself in the actual fishbowl, but changed my mind. I liked this composition better.


Notice that I changed the hair a bit. I wanted to add some length and just make it more...present, I guess. I used some brushes that I downloaded forever ago to add the hair and tried to blend it with my actual hair the best I could. I did a bit more blending and touching up to the hair later on in my editing. And I'll admit something: I actually hate using these types of brushes on my images, but since I don't have long, luxurious, model-worthy locks, I felt it would be okay.


If there's one thing I can decide on right away, it's how I want to crop the image. I always do this first, before I start the nitty-gritty editing. I figure it's also less work for Photoshop do to, since there's fewer pixels to deal with? You're welcome, Photoshop. I'm always lookin out for ya.


Now the fun part begins! This is the stage of editing I call "experiment-with-colors-levels-and-curves-until-something-clicks." That is literally what I do. I just try different things until I see something I like, and matches how I feel about the image. I was definitely striving for some kind of lightness or airiness....a subtle dreaminess. 


I love me some color curve adjustments. Here's a screenshot while I was messing around with the blue color channel. It was pretty much at this point that I knew this was what it was supposed to look like. It "matched" what I was feeling. I made a few more adjustments with brightness, contrast, and sharpening. 
Oh! I forgot to mention earlier that I did some Gaussian blurring to my body portion of the photo, to help match the shallow depth of field of the fishbowl photo. It's a subtle detail, but an important one, considering I shot the photos with two completely different apertures.

So, yep. That was pretty much my thought process behind making this image. Not too ground-breaking, I know, but I always enjoy reading how other photographers create something from scratch. And what's the point of a blog if you're not sharing?

I'm a camera collector.

Apr 25, 2012

First things first: Yes, I know it's completely unsurprising to know that someone who enjoys photography would also enjoy collecting old cameras. I am one of those people, so I guess that makes me a cliché. But it's like any other hobby or passion, right? If I were a video game enthusiast (which I'm so not. sorry dear husband, for the tenth time, no I will NOT try out playing Star Wars with you), I would probably collect old Atari's and original Nintendo gaming systems. Agreed? Moving on.

So here is my very modest collection of various cameras. Super small. No need to call the folks at Hoarders: Buried Alive. Yet.

Minolta X-370 | Ricoh 500
  Minolta XG-1 | Canonet 28 | Kodak Motormatic 35

  Polaroid Land Super Colorpack | Polaroid Land Automatic 103
Fujifilm instax 210 | Polaroid Land Time-Zero OneStep | Kodak EK4

  Kodak VR35 | BG Helioflex 3000T
Canon T50 | Diana Mini | Time Magazine Camera

Not too shabby. I found a lot of these while flea marketing or thrifting, and some were given to me by my mother-in-law (she goes to auctions and flea markets like it's her job).

Obviously, I will always be on the lookout for new (old) cameras to acquire, cause the hunt is half the fun. And the other half? Using them! I won't lie, I haven't used them all. But I shoot with my Minolta X-370 and Diana Mini all the time, and I've taken tons of polaroids with my non-folding Land camera. The Ricoh and Kodak Motormatic even came with film inside, which I'm still (slowly) trying to finish.

feeling lazy. meh.

Apr 18, 2012

I feel like I've been neglecting this space lately, and to be honest, I just haven't been inspired to write/share photos in the past week or so. I'm a bum.

But here's some snaps of my life as of late.

A few weeks ago, a photografriend asked me to be a model for a quick shoot she had to do for Pacific San Diego Magazine, so of course I said yes! So I got to ride a horse for a few hours at these beautiful riding grounds in Ramona. I can't wait to see how the photos turned out.

My kittah is a nut. Who thinks my bed is actually her bed.

Exploring hallways/nooks and crannies with friends + taking photos with said friends = a good day.

My first time eating a Smashburger. They had me at mushroom and swiss. It was pretty dang tasty!

music // The Parlour Suite

Apr 11, 2012


I found this via Miss Moss today. Take a listen :]

"The Parlour Suite is the surf-pop project, formed by Mpls (Minneapolis) husband-wife team, Joel and Inga Roberts, and supported on drums by Joshua Perez. The stories in the album are reflective of the cityscapes & sun soaked beaches that our tours have brought us to. Skateboarding on the boardwalk in Venice Beach & flipping thru CD’s at Earwax Records in Brooklyn. The songs are a bit of an escape from the winters in Mpls. We are set to hit the road with the album in April… bringing the songs back to the cities & places that are woven throughout the record."

hello staycation, nice to meet you.

Apr 6, 2012


The mister and I had our ninth anniversary earlier this week (alternatively, we like to call it "our marriage's ninth birthday. it's in fourth grade now.), and we're treating ourselves to a little staycation in the downtown/Gaslamp part of San Diego.

These are just a few of things I'm currently packing. As always, I'll bring more than I actually need, but you can never be too prepared. And I haven't worn this bikini since Spain, so I was happy to dust it off. Actually, I just took it out of a drawer. No dusting was involved.

If you need me, I'll be in the hotel's hot tub. I plan on never leaving.

pipe (and wooden) dreams

Apr 2, 2012

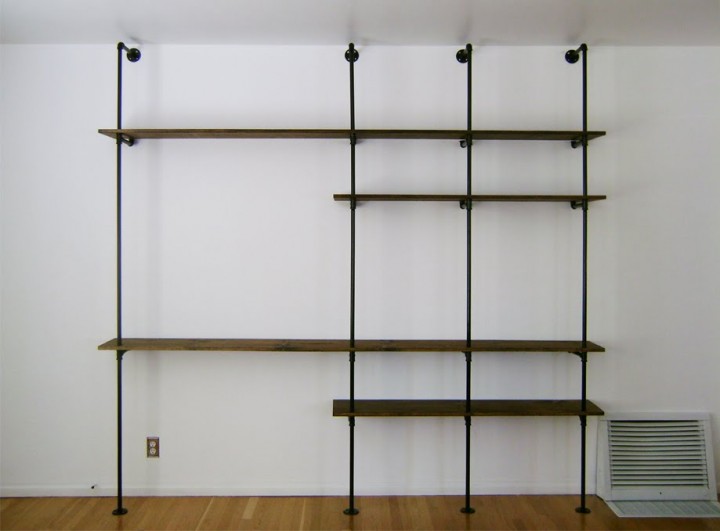
So not too long ago, in this post, I talked about how I took out our books and stacked them by color against a wall in the living room. Definitely bright and happy to look at, but obviously this is just a temporary solution. That's a lot of wall space, and I intend to use it.

Here is it's current state.


So I decided to take some inspiration from Morgan Satterfield's blog, The Brick House, and her genius DIY shelving unit. For a couple reasons. One, it just looks damn good. Simple. Stylish. And two, it'll be more budget-friendly than most of the shelving units I've seen at those big home-goods stores.

So the mister and I will tackle this project within the next month or so, and if all goes well, it will hopefully look like this:


Stay tuned.

local gem // La Mesa's hidden stairs

Mar 29, 2012

Not long after the mister and I moved into our house, we met this cute old lady on our street one day while she was out for a walk. We started chatting about how great the neighborhood is, and she told us about these "walking stairs" just up the hill a bit, and that we should definitely check it out. The stairways were installed several years ago to help facilitate foot traffic through the different neighborhoods. I was intrigued, but it wasn't until yesterday that I decided to grab my camera and check it out for myself.


Okay. So I already knew that this would be a bit of a workout; lots of locals use the stairs for exercise, and I had read somewhere that there were 248 or so steps to the very top. So I was prepared to sweat. What I was not prepared for: HOW OUT OF SHAPE I AM. No joke. My thighs burned. I wasn't even walking at a brisk pace, and I had to take a break halfway up the second set of steps to catch my breath. Obviously, I could use a little more exercise in my life.

So I took my sweet time, but I made it to the top. Which is just another residential street, but happens to be one of the highest points in La Mesa. I walked down the street a bit, and found another set of stairs going down. So I decided to take this way back to my house.


Don't be fooled by these charming-looking steps. They're steep, they seem to go on forever, and your legs will hate you if you're out of shape like me.

But the walk down? Oh so sweet.